Mounting a front-mounted anamorphic adapter to an EF-mount taking lens alters the optical axis, introduces additional glass-to-air interfaces, and shifts the physical center of gravity of the camera rig.
Anamorphic adapters are not drop-in filters. They are complex optical instruments that compress the horizontal axis of the image circle. This process introduces aberrations, limits light transmission (measured in T-stops), and alters depth of field calculations. To prevent optical degradation and mechanical failure, buyers must perform five specific technical evaluations before signing a purchase order.
---
1. Optical Alignment and Back-Focus Calibration
Anamorphic adapters require precise alignment relative to the taking lens's optical center. If the cylindrical elements inside the adapter are rotated even one degree off-axis, the result is skewed squeeze angles and severe astigmatism. This distortion cannot be corrected in post-production — it is baked into every frame.
To test this, mount the taking lens and adapter combination on an optical bench or a rock-solid tripod. Frame a Siemens star chart or a high-contrast grid pattern.
First, check center-to-edge sharpness. Focus precisely on the center of the chart and evaluate the corners. If the center resolves cleanly at, say, T2.8 but the left edge is noticeably softer than the right edge, the adapter suffers from decentering — meaning the optical elements are not perfectly centered within the housing. This is one of the most common manufacturing defects in budget anamorphic adapters, and it cannot be shimmed away. It requires a return or a warranty claim.
Second, check for astigmatism. Rack focus forward and backward through the focus plane. If the horizontal lines come into sharp focus at a different position than the vertical lines, the adapter's cylindrical elements are misaligned relative to each other. The result will be an image where part of the frame is tack-sharp while another part looks like it was shot through a soft-focus filter.
Ensuring exact tolerances is the single most critical factor in anamorphic adapter performance. Even sub-millimeter deviations in optical element positioning will introduce noticeable chromatic aberration and reduce resolving power across the frame. The tighter the manufacturing tolerance, the cleaner the image — and this is where budget optics consistently fall short compared to professional-grade units from manufacturers like Vazen, Atlas, or vintage Iscorama glass that has been professionally serviced.
Correcting back-focus on these adapters often requires the use of shims. If the adapter does not feature an integrated back-focus adjustment mechanism, you will be forced to use variable-thickness shims between the adapter mount and the taking lens. Without proper collimation, the system will fail to achieve infinity focus, rendering wide-angle taking lenses useless. Always ask the seller whether the adapter has been collimated to the specific taking lens you plan to use, or whether you will need to perform this calibration yourself.
---
2. Navigating the Dual-Focus Workflow vs. Single-Focus Solutions
Anamorphic adapters operate on one of two focusing principles: dual-focus or single-focus. Understanding the difference is not academic — it dictates your entire shooting workflow.
In a dual-focus system, the operator must set the focus distance on the taking lens and the adapter to the exact same measurement. For example, if the subject is at 3 meters, both the taking lens and the adapter must be set to 3 meters. If one is set to 2.9 meters, the image suffers from immediate contrast loss and spherical aberration. There is no forgiveness in this system; precision is mandatory on every take.
This dual-focus workflow is highly impractical for run-and-gun shooting, documentary work, or any fast-paced production. It limits the camera operator to static shots or scenes with locked-off focus. Pulling focus on a moving subject becomes a two-handed operation that demands perfect synchronization — one hand on each focus ring, moving at exactly the same rate. In practice, this means either rehearsing the move until it is muscle memory or assigning a dedicated assistant to the adapter ring.
Single-focus solutions solve this by incorporating an additional optical group — typically a variable diopter — in front of the adapter. The taking lens is set to infinity, and focus is controlled solely via the front diopter. This transforms the anamorphic adapter into something that behaves more like a conventional lens: one ring, one focus plane.
Dual-focus configurations introduce significant latency to the focusing workflow, making real-time tracking of moving subjects impractical without a dedicated focus puller and synchronized remote motors.
Most EF anamorphic adapters require manual focus. Do not assume that autofocus systems will function. The added weight, physical drag of the adapter's focus ring, and altered optical path will cause autofocus motors to hunt, overheat, or fail completely. Some mirrorless bodies with on-sensor phase detection can achieve rough focus confirmation, but the accuracy will be inconsistent and the speed will be unacceptable for any professional application.
If you are considering a dual-focus adapter because of its lower price point, calculate the real cost: the additional time spent calibrating both rings before every setup, the risk of missed takes due to focus drift, and the need for a follow-focus system with dual gear rings. For many shooters, the premium paid for a single-focus adapter is recovered within the first week of production.
---
3. Matching Squeeze Factors to Sensor Aspect Ratios
The squeeze factor determines the horizontal compression ratio of the image. The most common squeeze factors are 1.33x, 1.5x, and 2x. This factor must match the physical aspect ratio of your camera sensor to output a standard widescreen format without excessive cropping.
For example, a 1.33x adapter paired with a standard 16:9 (1.78:1) sensor yields a final desqueezed aspect ratio of approximately 2.37:1. This is a highly efficient use of the sensor area — nearly every pixel contributes to the final image.
However, if you mount a 2x adapter on a 16:9 sensor, the desqueezed image aspect ratio becomes 3.56:1 — an ultra-panoramic strip that no standard delivery format uses. To fit this into a standard 2.39:1 delivery format, you must crop the sides of the image, wasting approximately one-third of your horizontal sensor resolution. That is resolution you paid for, sitting outside the delivery frame.
To evaluate the math, refer to the following breakdown:
| Squeeze Factor | Sensor Aspect Ratio | Uncropped Desqueezed Aspect Ratio | Sensor Area Utilization | Compatibility Notes |
|---|---|---|---|---|
| 1.33x | 16:9 (1.78:1) | 2.37:1 | ~99% | Ideal for standard 16:9 sensors; minimal crop needed for 2.39:1 delivery. |
| 1.5x | 16:9 (1.78:1) | 2.67:1 | ~89% | Requires moderate side cropping for 2.39:1 delivery. |
| 1.5x | 4:3 (1.33:1) | 2.00:1 | 100% | Ideal for television formats and specific sensor modes (e.g., Open Gate on select cinema cameras). |
| 2x | 4:3 (1.33:1) | 2.66:1 | ~90% | Requires minor cropping for standard 2.39:1 widescreen. |
| 2x | 16:9 (1.78:1) | 3.56:1 | ~67% | Severe resolution loss due to heavy lateral cropping; only viable for extreme widescreen or specialty formats. |
Selecting the wrong squeeze factor also impacts the optical character of the image. A 2x squeeze factor produces the classic oval out-of-focus highlights (bokeh) and highly pronounced horizontal flares that audiences associate with the cinematic anamorphic look. A 1.33x squeeze factor produces almost circular bokeh and minimal flare artifacts — technically anamorphic, but visually closer to a spherical lens. If your primary motivation for shooting anamorphic is the distinctive bokeh shape and flare behavior, a 1.33x squeeze may not justify the added weight, complexity, and cost of the adapter.
Consider your delivery requirements carefully. If you are producing content for streaming platforms that mandate a 16:9 flat finish, a 2x adapter on a 16:9 sensor will either force heavy cropping or require you to letterbox within the 16:9 frame, losing effective resolution in both directions.
---
4. Sensor Coverage and Vignetting Risks on Full-Frame Bodies
Sensor coverage is determined by the rear element diameter of the anamorphic adapter and the focal length of the taking lens. This is where many first-time anamorphic buyers hit a wall.
When using a full-frame sensor (36mm × 24mm), the image circle must be at least 43.3mm in diameter to cover the sensor without vignetting. Most anamorphic adapters have a restricted rear aperture — the physical diameter of the rear glass element is often smaller than you would expect. If the rear element of the adapter is smaller than the front element of the taking lens, it acts as a physical aperture stop, causing mechanical vignetting (hard black corners) or optical vignetting (progressive light falloff and shading at the edges).
The practical limits on full-frame bodies look roughly like this:
- A 50mm taking lens is usually the widest focal length usable with a medium-sized adapter (e.g., 50mm rear thread diameter) without significant corner shading.
- A 35mm taking lens will almost certainly vignette, showing the inner barrel of the adapter as a dark circular intrusion into the frame corners.
- On Super 35 sensors (approximately 24.8mm × 18.6mm), you can typically use wider taking lenses — down to 28mm or 35mm — without vignetting, because the required image circle is significantly smaller (approximately 31mm).
Before purchasing, calculate the entrance pupil position of your taking lens. The entrance pupil is the apparent position of the aperture as seen from the front of the lens. If the entrance pupil sits deep inside the lens barrel, light rays at the periphery of the image circle must travel at steeper angles to pass through the adapter's rear element, increasing the risk of mechanical vignetting. Lenses with flat front elements, short physical lengths (under 80mm), and entrance pupils positioned close to the front element tend to perform best with front-mounted adapters.
Vignetting from an undersized adapter rear element is not a post-production fix — it is permanent resolution loss in every frame. Confirm image circle coverage before you buy, not after you shoot.
If you shoot primarily on full-frame and are unwilling to restrict yourself to 50mm and longer taking lenses, consider an adapter with a larger rear element diameter. Some premium models use 72mm or even 82mm rear threads, which dramatically improve wide-angle compatibility. The trade-off is increased weight and a higher price point.
---
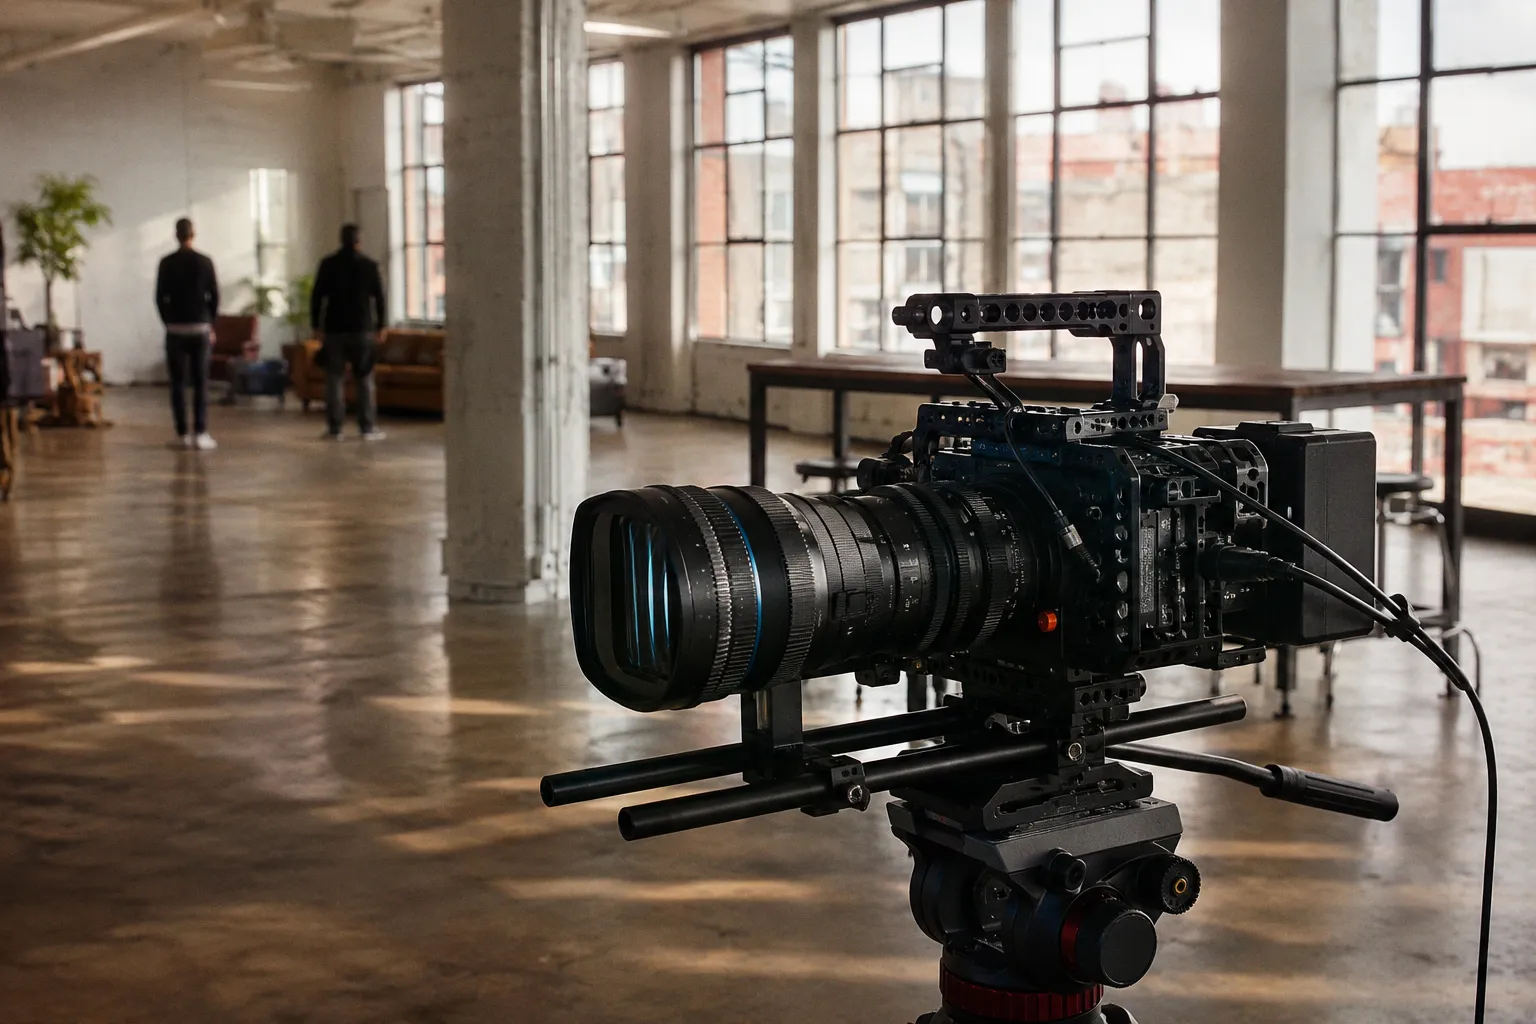
5. Rigging Requirements: Managing Weight Distribution and Lens Support
Anamorphic adapters are heavy. A typical unit weighs between 700 grams and 2.5 kilograms, depending on the optical design and housing material. This weight is positioned at the very front of the taking lens, creating a significant leverage arm that amplifies the effective load on the lens mount.
Standard EF mounts are bayonet-style and rely on leaf springs to hold the lens in place. While they are perfectly secure for standard prime lenses weighing 300–600 grams, they are not engineered to support heavy cantilevered loads extending 15–20 centimeters forward of the mount flange.
Suspending a heavy adapter directly from the filter threads of a taking lens can cause three distinct mechanical failures:
1. Thread damage: The aluminum or brass filter threads on the taking lens can strip, cross-thread, or deform under sustained lateral stress. Once the threads are damaged, the taking lens may no longer accept standard filters, let alone the adapter.
2. Lens barrel sag: The internal helicoids of the taking lens can compress unevenly under the adapter's weight, causing focus binding, inconsistent throw, and decentering of the optical elements.
3. Mount deflection: The EF mount on the camera body can flex under the cantilevered load, shifting the flange focal distance and tilting the sensor plane relative to the optical axis. Even a fraction of a degree of tilt introduces focus plane deviation that varies across the frame.
To prevent all three failure modes, a dedicated rod support system is mandatory. You must run 15mm LWS (Lightweight Support) or 19mm studio rods beneath the lens. A lens support bracket — sometimes called a "donut" or "cradle" — must be clamped to the adapter barrel or the taking lens to transfer the weight directly to the camera baseplate and rods, bypassing the EF mount entirely.
Standard EF bayonet mounts are rated for static lens loads; suspending an unsupported 1.5 kg anamorphic adapter from the filter threads of a taking lens risks structural failure of the mount and permanent sensor plane misalignment.
Furthermore, check whether the front element of your taking lens rotates during focusing. Many popular EF-mount lenses — including the Canon EF 50mm f/1.4 USM and the Canon EF 85mm f/1.8 USM — have front barrels that rotate as you rack focus. If you clamp a heavy adapter to a rotating front barrel, the adapter's mass creates rotational inertia that fights the focus motor, potentially stalling it. Worse, the clamping force of the support bracket can lock the front barrel in place, stripping the internal gears of the taking lens when you attempt to focus.
Lenses with internal focus (IF) designs, where the front element does not rotate, are strongly preferred for anamorphic adapter use. The Canon EF 24-70mm f/2.8L II USM, for example, uses an internal zoom and focus mechanism that keeps the front barrel stationary — making it a far more reliable platform for adapter mounting than lenses with rotating front elements.
---
6. Transmission Loss and Chromatic Aberration Metrics
Every additional glass element in the optical path reduces light transmission. Anamorphic adapters typically contain 2 to 4 optical elements, and this glass introduces a transmission loss of approximately 0.2 to 0.5 T-stops. While this sounds minor, on a camera body that is already metering at the edge of its usable ISO range, half a T-stop can be the difference between clean shadow detail and unacceptable noise.
More critically, these adapters introduce chromatic aberration — both lateral and axial. Because anamorphic cylindrical elements bend light differently on the horizontal and vertical axes, blue and red wavelengths fail to converge on the same focal plane at the edges of the frame. The result is color fringing on high-contrast edges: typically magenta or green halos along the sides of the frame, with the center remaining relatively clean.
When evaluating an adapter for chromatic performance:
- Shoot a test chart with high-contrast elements (black grid on white background) and examine the corners at 100% magnification on a calibrated monitor.
- Measure the color fringing using a vectorscope — lateral chromatic aberration will appear as distinct color shifts concentrated along the horizontal axis.
- Test at multiple apertures. Most adapters perform significantly better stopped down to T4.0 or T5.6 than wide open at T1.4 or T2.0. If your production style demands wide-open shooting for shallow depth of field, budget-tier adapters will almost certainly yield unacceptable corner fringing and softness.
Stopping down also improves overall sharpness and reduces the impact of any residual decentering. For this reason, many experienced anamorphic shooters plan their lighting setups around T4.0 as a working aperture, treating wider stops as a creative exception rather than the default.
---
Technical Verdict
Do not purchase an EF anamorphic adapter under the assumption that it will seamlessly convert any standard prime lens into a cinema-standard anamorphic system. Every adapter introduces optical compromises — some subtle, some severe — and the margin between a beautiful image and an unusable one is often a matter of a few millimeters of alignment or a single stop of aperture.
If your workflow demands rapid setup times, autofocus capability, or wide-open shooting at T1.8, front-mounted adapters are not the right tool. The dual-focus complexity, vignetting limitations, and rigging overhead will disrupt production efficiency and erode the cost savings that attracted you to an adapter in the first place.
If you have the rigging infrastructure already in place — rods, lens supports, follow-focus systems — and can tolerate working at T4.0 or slower, a well-collimated, single-focus anamorphic adapter paired with a compatible taking lens can deliver the compressed geometry, oval bokeh, and horizontal flares that define the anamorphic aesthetic. But verify every parameter on this list before committing to a purchase. Test the optical alignment on a projector or optical bench. Confirm sensor coverage at your working focal length. Weigh the complete rig and ensure your support system can handle it. The adapter is only as good as the system you build around it.